Lemongrass-Cilantro-Lime Marinade (for chicken or pork)
September 13, 2016 § 2 Comments
Over the years (decades really) I’ve experimented with various herbs. My first set of cooking explorations were with dried basil. Which evolved to other dried herbs like oregano, marjoram, thyme, rosemary, sage, etc. As my cooking skills improved I moved on to fresh herbs and even grew my own. I eventually moved on to experimenting with less common culinary flavorings like rose water, sumac, and galangal. With the melting pot of produce available these days I’ve been able to explore a whole new world with fresh ingredients. My latest…Lemongrass.
I’ve always enjoyed the lemongrass flavor in southeast asian cuisine. I tried using dried lemongrass but found the flavor never truly carried through and the hard splintery pieces often ruined the texture of the food.
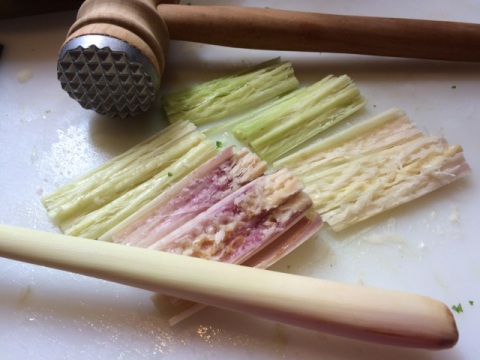
I am certainly not an expert in utilizing lemongrass but below is a recipe that I’ve made several times and the results have been consistently good. To help infuse the flavor of the lemongrass into the marinade I slice the stalks lengthwise and hammer it with a meat tenderizer. I keep the chunks big enough so any chewy strips can be easily picked out.
NOTE: I like to serve this with two toppings – a fresh chopped herb combination and fried shallots (recipes below). You can also spice-up this dish with Korean Bi Bim Bap sauce as a condiment.
Lemongrass-Cilantro-Lime Marinade (for chicken or pork)
MARINADE:
¼ cup Lime Juice
2 Tbls. Fish Sauce
1 Tbls. Soy Sauce (use gluten free soy to make this a GF recipe)
1 Tbls. Sherry or Brandy
1 tsp. Brown Sugar
1 Tbls. Garlic, chopped
2 Tbls. Cilantro, fresh chopped
1 Tbls. Scallions, chopped
1 stalk Lemongrass, fresh crushed*
White Pepper
1 to 1 ½ lb. Chicken, boneless breasts or thighs
or
1 rack Pork Baby Back Ribs
or
1½ to 2 lb. Country Style Ribs, or bone-in pork chops
* Crush lemongrass by slicing stalks into 3-4 inch pieces, then slice them lengthwise and hammer it with a meat tenderizer. This will help the flavor blend into the marinade better.
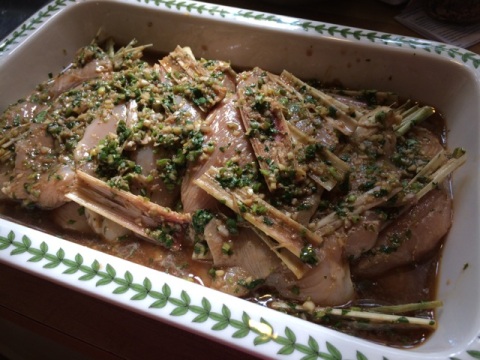
Marinade – In a bowl, combine lime juice, fish sauce, soy sauce, sherry or brandy, brown sugar, garlic, cilantro, scallions, lemongrass, and white pepper.

Pour mixture on meat, coating well. Place chunks of lemongrass between meat to help the flavor disperse. Let it marinate at least 1 hour to overnight.
Grill meat – Grill chicken on medium high heat with an open lid. Meat should be browned and cooked through. Thin pieces generally cook in 10-15 minutes.

Grill ribs on low heat with a covered lid. Depending on the thickness of the ribs, it will take about 20-30 minutes on each side. Monitor grilling because fatty areas of ribs may cause flame to flair and cause charring of ribs.

Alternately, chicken can be cooked using a grill pan and ribs can be baked in an oven.
TOPPING 1: FRESH HERBS
¼ cup Basil, fresh chopped
¼ cup Cilantro, fresh chopped
¼ cup Mint, fresh chopped
1 Tbls. Scallions, chopped (optional)
In a bowl, combine basil, cilantro, mint, and scallions, stirring herbs until they are mixed evenly.
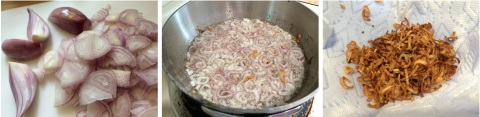
TOPPING 2: FRIED SHALLOTS
2 lg. Shallots, sliced
1 cup Vegetable Oil (or Canola)
Heat oil in small pan so oil is about ½-inch deep. Carefully add 1/3 of shallots into hot oil and cook until light brown. Remove cooked shallots with slotted spoon onto paper towel. Repeat with each third. Shallot flavored oil can be saved for use in other dishes.
Serving suggestions – Serve meat on cooked sushi or long-grain rice. Sprinkle herb mixture and fried shallots on top. If you like a hot kick to the dish, add Korean Bi Bim Bap sauce (seasoned red pepper paste). You can also make a side dish of Spicy Cucumbers – Slice cucumbers tossed in some Bi Bim Bap sauce.
NOTE: Below is a photo of the ribs without fried shallots. I forgot to take a plated photo of the chicken version (sorry).

Nostalgia
July 15, 2016 § Leave a comment
When I started this blog it was all about creating new memories of warmth and familial bonds. Many of my recipes take time to prepare – time to infuse your passion into each herb you chop, each concoction of ingredients you stir, each pot of simmering elixir wafting through your home. Today I want to step back in time when something simple and obvious was exciting and new…
I won’t say what year it was but I was 14. I was thinking of becoming a nurse so I decided to volunteer at the local town hospital to see what it might be like. To give you some perspective of time let’s just say I was called a candy striper. Regular duties would include helping at the front desk, sorting internal mail, delivering flowers to patients, and sometimes helping out in the cafe (not the large cafeteria but the little cafe that patient visitors would often go to if they need a cup of coffee or a small bite and some quiet time).
I always felt at home in a kitchen so I loved helping out in the cafe. The customers in the cafe were people who were visiting their sick loved ones. Usually tired and emotionally drained. Some had been sleeping in a chair all night. They wanted a quiet place to refresh themselves. That’s where volunteers like me stepped in. We weren’t there for the tips. We served them coffee and gave them a smile.
The cafe served simple fare – coffee & tea, donuts, eggs & bacon, and sandwiches. When I say sandwiches I don’t mean what you would find now-a-days like grilled panini’s, banh mi sandwich, or even a foot-long hero. They served ham and cheese, turkey and cheese, egg salad, and something I had never heard of…ham salad.
I know, you’re thinking “Seriously? This blog is actually about ham salad?” Well, yes but it’s also so much more. This simple concoction of chopped ham and pickles was something I never had in my then, 14 long years of life! It was new and exciting. Sure, I had plain ham before but not this combination of sweet and salty and sour and soft and crunchy all at the same time goodness!
To this day, every time I have leftover baked ham I have to make ham salad. Maybe it’s the taste, maybe it’s the memories. Maybe it’s because it brings me back to a time when the simple act of pouring someone a cup of hot coffee and handing them a sandwich with a smile could make a difference.

The head chef in the cafe I’m sure thought it was quite hysterical that this little girl was so fascinated with how to make ham salad. If I recall correctly his recipe was – chopped ham, relish, and mayonnaise. Over the years I’ve improvised. I vary between chopped Dill or Bread and Butter pickles. I sometimes add fresh herbs. I’ve tried different types of mustard to give it a little spicy kick. The one thing I always do…I never measure my ingredients. So here is a basic recipe that can be improvised to your personal taste.
Ham, chopped
Pickles, chopped (Dill or Bread and Butter is recommended)
Mayonnaise
Dijon Mustard
Dash of Worcestershire Sauce
Sprinkle of dried Dill
Ground Black Pepper
Chop pickles and ham to 1/8-inch pieces.

Place all ingredients in a bowl and combine well.

My first ham salad sandwich was made with cloud soft Wonder Bread. As my recipe evolved so have the many ways I consume this simple salad. As photographed above, any type of bread works but it’s not only for sandwiches now…
Ham Salad on Salad.
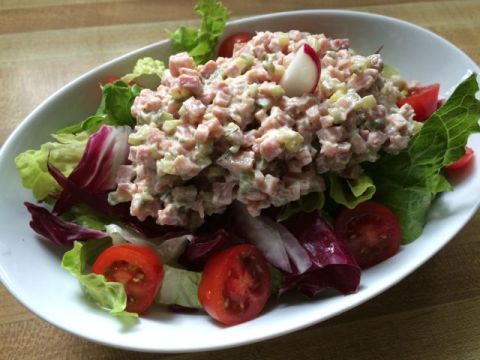
Ham Salad in Cucumber Cups.
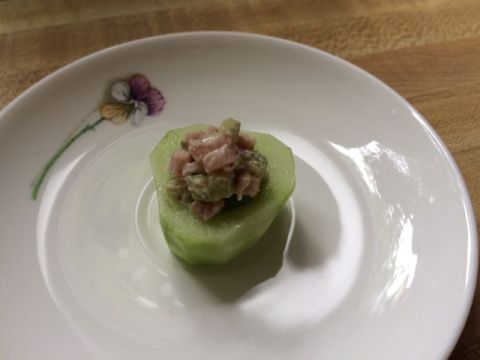
Ham Salad in Lettuce Wraps.

Ham Salad in Tomato Cups.
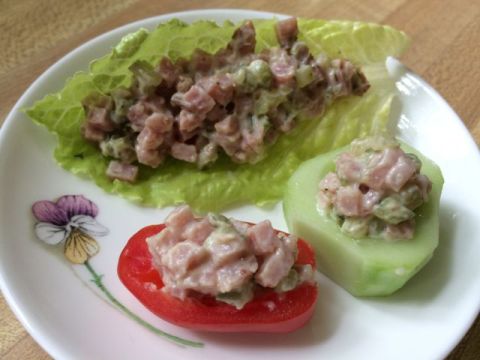
Always served (and eaten) with a smile.
Beef Back Ribs with Herb Marinade
July 28, 2012 § Leave a comment
I’ve been rather lax on the blogging this Summer but not on the grilling! I’ve been experimenting with a variety of recipes but still working on ones that I deem “blog-worthy.” Here is one that I feel makes the cut.
Normally when I make ribs, either pork or beef, I automatically think “Barbeque Sauce” – tangy, orange-red, thick sticky sauce with a little kick. But with the abundance of fresh herbs bursting out of my garden I decided to do something different. The result was a refreshing change. Instead of the sauce being the highlighting flavor, the herbs enhanced the taste of the beef ribs.

There is a distinct difference between “Beef Back Ribs” and “Beef Short Ribs” – The Back Rib runs along the side of the Ribeye Steak and is usually carved 6 to 8-inches long and has very little meat except what is found between the bones. Of course, that’s why there is so little meat left on these bones, the tender flavorful meat is carved onto the boneless Ribeye Steak. The Short Rib is cut along the Flank Steak and Brisket, is generally 3 to 5-inches in length and has a nice thick marbled piece of meat along one side of the bone, which makes them perfect for braising.
You can bake or grill the ribs for this recipe. I chose to cook them for a shorter time than some recipes you may find because I found the longer cooking time dried them out or over crisped the edges and made them too chewy. With the shorter cooking time the meat will still stick onto the bones a little but the meat will still be tender and full of flavor.
3 ½ lbs (about 8 ribs) Beef Back Ribs
2 Tbls. Garlic, chopped
1 tsp. each – Rosemary, Thyme, Sage, and Oregano, fresh chopped
2 Tbls. Lime Juice
2 Tbls. Worcestershire Sauce
2 Tbls. Port Wine
1 tsp. Black Pepper
½ tsp. Salt
2 Tbls. Olive Oil
In a bowl, combine garlic, rosemary, thyme, sage, oregano, lime juice, Worcestershire Sauce, Port Wine, black pepper, salt, and olive oil. Stir or whisk until combined evenly.

Rub the marinade all over ribs and place in a platter or Ziplock bag to marinate overnight or for at least six hours.

OVEN METHOD: Preheat oven to 325° and line a baking pan with aluminum foil. Place ribs in a single layer on pan. Pour any residual liquid from platter or Ziplock bag onto ribs.

Bake for 1 hour and 15 minutes. The ribs should be well browned but not burnt and the meat will pull away from ends of the bone. Remove the pan from the oven and cover with a piece of aluminum foil for 15-30 minutes. This will soften the dry ends of the ribs and help the meat retain the juices. Serve while still warm.

GRILL METHOD (using a gas grill): Heat the grill to 450°. Place the ribs on the grill and lower the burners to low, maintaining a temperature of 350° or slightly lower. Cook for 20 minutes with the lid closed, being careful not to over char the ribs. Flip the ribs over and cook for another 20 minutes. Flip the ribs a third time and cook another 20 minutes (the lid should be closed throughout the cooking time). Total cooking time 1 hour. Remove the ribs to a platter and cover with a piece of aluminum foil for 15-30 minutes.
(Sorry, I have not taken photos of the grill method but I will add them soon)
For those of you who are like me and like to have an old fashion printed copy of recipes, the below link is to a PDF (minus photos to keep it on one page).
Spring Lamb Stew
June 22, 2012 § Leave a comment
For the past six weeks I’ve been gloriously shopping at the local farm stands and I can’t wait for the open-air Farmer’s Market to start!

I have been experimenting with various locally grown baby vegetables for weeks now and my favorite recipe so far is for Spring Lamb Stew. What comes to mind when many people think about lamb stew is a rich hearty broth that has been braising in the oven for hours but that just isn’t necessary. Lamb stew doesn’t need to be reserved for cold winter months. For this recipe I utilize the fresh spring crop vegetables and tender chunks of lamb leg meat to create a light, fresh flavored stew.

NOTE ABOUT CUTS OF LAMB: I tried various cuts of lamb for this recipe – shoulder, neck, and boneless leg. Although less expensive, I found the shoulder and neck cuts gamier in flavor. I generally like lamb leg meat cooked medium to medium rare but for this stew the cut allowed me to cook the stew quickly (about 45 minutes to brown meat and I used par cooked veggies) and still produce tender chunks of meat.
2-3 lbs. Lamb leg, cut into 1 to 1½ inch cubes
3 large cloves (about 2 Tbls.) Garlic, chopped
1 Tbls. Worcestershire Sauce
Salt and Pepper
5-6 cups “Spring Vegetables” par cooked if they need more than 5 minutes to cook
Example of vegetables that could be used: Green Peas, Fava Beans, Young White or Red Turnips, Carrots, Baby Beets, Parsnips, Sugar Snap Peas, Garlic Scapes, etc. (see example in chart below)
For this recipe I used the following vegetables and par cook times:
| 1 ½ cups Green Peas | Do not need to par cook |
| 1 ½ cups Young White Turnip | 3 minutes |
| 1 ½ cups Carrots | 3 minutes for whole baby carrots. Do not need to par cook if sliced small |
| 1 cup Baby Beets, sliced in half or quarter and 3 cups of the Beet Greens, chopped | 5 minutes for baby beets. Do not need to par cook beet greens |
18-24 Pearl Onions, red or white, peeled
3 cups Baby Potatoes, cut in half or quarter, and par-cooked for 10 minutes
2 Tbls. Olive Oil
½ cup light red or white wine*
2 Tbls. Sage, fresh chopped
1 tsp. Rosemary, fresh chopped
3 cups Low Sodium Chicken Broth
* A red wine will develop into a richer flavor in this stew but stay with a light red. I used a light Rioja for this recipe. White wine can also be used and will develop into a very light fresh taste that enhances the sweetness of the vegetables. Again, stick to a light white. I’ve use a light Pinot Grigio in the past.
PAR COOK VEGGIES: Bring a large pot water to a boil. Assess which vegetables bleed in color (like beets) or have a strong flavor (like pearl onions).

Cook the vegetable that bleeds in color second to last and the pearl onions last. Par cook vegetables separately in hot water, lifting vegetables out with a slotted spoon when cooked and cooking the next vegetable.

Sliced red, golden, and purple new potatoes
For example, using the vegetables noted in the chart above: Cook turnips for 3 minutes then remove with slotted spoon. Let water return to boil and cook carrots for 3 minutes. Remove with slotted spoon and put beets in water when it returns to a boil and cook for 5 minutes. Last, place pearl onions in water for 30 seconds (no more or they will get too soft). Just the pearl onions need to be rinsed in cold water or placed in an ice water bath. Peel outer skin of the onion by cutting the ends and pinching the center of the onion out.

The vegetables can be prepared to this point in advance and set aside until ready to cook stew.
NOTE: For good directions on how to peel pearl onions check out http://startcooking.com/blog/202/How-to-Peel-Pearl-Onions
PREPARE STEW: Heat 2 Tbls. oil in a heavy saucepan. Brown the lamb on high heat. If necessary, brown the meat in 2-3 batches so each piece browns nicely. When all the meat is browned, return the meat to the pan and add pearl onions. Lower heat to medium-high and saute for 2-3 minutes. Add wine and continue stirring for 1 minute. Add all the vegetables (except the beet greens), rosemary and sage. Stir until everything is mixed evenly. Add chicken broth and bring to a full boil. Boil uncovered for 8 minutes. Add beet greens and cook for another 2-3 minutes.

Serve as a one-pot-meal or with a nice crusty bread.
For those of you who are like me and like to have an old fashion printed copy of recipes, the below link is to a PDF (minus photos to keep it on one page).
Roasted Beets with Balsamic Glaze
April 8, 2012 § 3 Comments
For many people what comes to mind when they think about eating beets are deep red slices pickled in a jar or cubes swimming in a bowl of bright pink borscht. But this vitamin rich, often neglected vegetable needs very little seasoning to enhance its sweet flavor
Beets are a rich source of antioxidants and nutrients, including magnesium, potassium, vitamin C, and betaine. Beetroot juice has been shown to lower blood pressure and improves cardiovascular health.
This recipe is a versatile dish that can be used as a vegetable side, sprinkled on a salad, or topped on pieces of Crostini with goat cheese spread.

NOTE: You can use all one color beets or as I note in this recipe, half red and golden. If you choose to use two colors be sure to mix them at the last minute because the color of the red beets will bleed into the lighter colored beets.
¾ lb Red Beets, peeled and cut into ¼-inch cubes
¾ lb Golden Beets, peeled and cut into ¼-inch cubes
Salt and Pepper
2 Tbls. Rosemary Garlic Oil or Olive Oil
2 Tbls. Balsamic Glaze (recipe below)
Preheat oven to 375°. Line a large baking sheet with parchment paper (alternately, use two smaller baking sheets). Set aside.
Place red beets in a bowl, add 1 Tbls rosemary garlic oil or olive oil and stir until oil evenly coats beets. In a separate bowl, do the same with the golden beets.

Pour the red beets on one side of the baking sheet and the golden beets on the other, leaving about a 1-inch space between beets. Spread the beets so the cubes are one layer thick. Sprinkle with salt and pepper. Bake until you can pierce a piece of beet with a fork easily but still be slightly firm, about 20-25 minutes.

If you plan to serve immediately, pour the beets into a large bowl. If you plan to serve later, pour each type of beet into separate bowls and combine shortly before serving.
When ready to serve, stir in 2 Tbls of the Balsamic Glaze into beets. Beets can be served warm, room temperature, or cold.

Balsamic Glaze
½ cup Balsamic Vinegar
3 Tbls. Brown Sugar
In a saucepan, combine balsamic vinegar and brown sugar. At medium-high heat, bring the mixture to a boil stirring occasionally. Lower the heat to medium-low and simmer for 10 minutes. Remove from heat and let cool. Store in an airtight container for up to one week at room temperature.
SERVING SUGGESTION: Spread soft goat cheese onto Crostini, top with roasted beets and minced chives. Try this recipe with Rosemary and Garlic Focaccia.

For those of you who are like me and like to have an old fashion printed copy of recipes, the below link is to a PDF (minus photos to keep it on one page).
Grilled Lamb Leg (boneless)
April 5, 2012 § Leave a comment
I know many people enjoy it but I never could understand why people have mint jelly with lamb. To me, it seemed like serving ketchup with fillet mignon – you really shouldn’t need a condiment. The earthy flavor of lamb should be enhanced with fresh herbs and seasoning.
This recipe adds a subtle fruity flavor to the traditional garlic and rosemary herbs used to season lamb. Flattening a boneless lamb leg also speeds up the cooking time. Season the meat overnight and it can be grilled under 30 minutes.
For information about the difference between American and Australian/New Zealand lamb see my blog for Lamb Shanks with White Beans and Gremolata.
")
NOTES: This recipe is prepared on a Weber gas grill with three horizontal burners and a temperature gauge on the cover. You may need to adjust the cooking method if you are using a different burner configuration or if you are using a coal or wood fueled grill. I did not use an internal meat thermometer, simply because I don’t have one, so I could not note the meat temperature in this recipe. The lamb in this recipe is prepared “medium” – evenly pink throughout the meat.
4 lbs. Lamb Leg, boneless
2 Tbls. Worcestershire Sauce
2 Tbls. Orange Juice
2 Tbls. Olive Oil
1 Tbls. Balsamic Vinegar
2 tsp. Lemon Juice
1 Tbls. Tomato Paste
1 Tbls. Garlic, chopped
1 Tbls. Flat Leaf Parsley, fresh chopped
2 tsp. Rosemary, fresh chopped
¼ tsp. Black Pepper, fresh ground
PREPARE LAMB: In most cases, when purchasing boneless lamb leg, it will be tied with string or held together by netting. If this is the case, remove all string or netting and open lamb so it is a thick flat fillet of meat. If necessary, slice into meat so it will lay fairly flat. The meat should be about 3-inches thick (if it is thinner, adjust grilling times). Try to keep the thickness even so it will cook consistently. If there is a layer of fat on the outer side of the meat, leave a thin layer, about 1/8-inch. Too much fat may cause the grill to flare and char the meat but too little will make the meat a little dry. Place the meat in a rectangular pan that will allow the meat to lay flat or place meat in a Ziplock bag. Set aside in refrigerator while mixing marinade.
MARINADE: In a bowl, combine all the ingredients except the lamb.
 - marinade")
Mix well and pour onto meat, being sure to cover all surfaces. Let meat marinate for at least one hour to overnight.
 - marinating")
NOTE: The piece of lamb photographed in this blog is 2 lbs (half a lamb leg) but this recipe is written based on preparing a full leg, approximately 4 lbs.
GRILL: Turn the grill onto high heat, covered, until the grill temperature reaches 400°. Brush a thin layer of vegetable oil onto grill to prevent meat from sticking. Place the lamb onto grill, fat side (outer side of the meat) down first. Turn the center burner to the lowest heat setting and turn the side burners to medium. Maintain a grill temperature of 375°. Cook with the grill covered for 7 minutes. Check half way through cooking to make sure fat is not causing meat to char too much. If it is, lower heat or cook with lid open for a short time. Turn meat over and continue to cook with the cover closed for 14 minutes. Continue to maintain a grill temperature of 375°. Remove the meat to a platter and cover with aluminum foil for 10 minutes.
 - grilling")
Cut the meat into ¼-inch slices. Serve while still hot.
SERVING RECOMMENDATIONS: Try my recipe for Smashed Potatoes or if you want something very simple, try boiling small potatoes for 15-20 minutes, drain, coat them with olive oil, salt and pepper. Serve the potatoes as is or prepare them in advance and put them on the grill next to the lamb to warm them up.
For those of you who are like me and like to have an old fashion printed copy of recipes, the below link is to a PDF (minus photos to keep it on one page).
Smashed Potatoes
April 3, 2012 § 4 Comments
Yes, that’s smashed not mashed. Not only is this recipe delicious but it is a beautiful side that your guests will be talking about over and over again. Rosemary Garlic Olive Oil fills the potatoes with great flavor but you can use plain olive oil if the taste will compete with your main course.
This recipe works well with any type of baby potato or sweet potato. What is so stunning about this simple, twice-cooked potato dish is the colors.

12-14 (about 2 lb.) Baby Potatoes* or Baby Sweet Potatoes**
Rosemary Garlic Olive Oil (plain Olive Oil or herbed oil can be substituted)
Salt and Pepper, coarsely ground
* I generally use baby red potatoes but any type of small potato will work, such as Yukon Gold, purple potatoes, and fingerling potatoes.
** If you cannot find baby sweet potatoes, choose sweet potatoes that are on the smaller side (about 6 inches long) and cut in half (across short side, leaving a point on each piece) for this recipe. There are a variety of sweet potatoes available. Keep in mind the color of the skin vs. color of the flesh if you are looking to create a stunning impression. For example, Japanese Sweet Potatoes have a deep burgundy skin but the flesh is pale yellow, where as a Garnet Yam will have a deep colored skin and bright orange flesh.

SPECIAL EQUIPMENT: Parchment Paper
Wash potatoes and if necessary, trim off any blemishes. Place potatoes in a saucepan and fill with cold water, covering potatoes by at least one inch. Bring the potatoes to a boil and cook for 15-18 minutes. You should be able to pierce the potatoes easily with a pin but the skins should not be falling off of the potatoes.

Drain the potatoes and allow to cool for about an hour. While the potatoes are cooling, line a large sheet pan with parchment paper. Brush parchment with rosemary garlic oil. Set aside.
Smash the potatoes – Cut two squares of parchment paper about 7×7. Place one potato between the paper sheets. Using the palm of your hand or if you have a potato masher with a flat surface, press down on potato until it is 1-inch to ¾ of an inch thick.

Place the potato on the lined baking sheet and continue pressing the rest of the potatoes. When all the potatoes are smashed, brush the potatoes with rosemary garlic olive oil. Sprinkle coarse ground salt and pepper on top.


Garnet Yams have dark red skin and bright orange flesh. Japanese Sweet Potatoes have deep burgundy skin with a pale yellow flesh.
NOTE: Potatoes can be prepared to this point, covered with plastic wrap and kept in the refrigerator up to a day in advance.
Preheat oven to 375°. Bake the potatoes, uncovered, for 30 minutes. If you would like the potatoes to be crispier, flip them over after 20 minutes and continue baking 10 more minutes. Serve hot.
For those of you who are like me and like to have an old fashion printed copy of recipes, the below link is to a PDF (minus photos to keep it on one page).
Rosemary Garlic Olive Oil
April 1, 2012 § 4 Comments
Rosemary and Garlic infused Olive Oil is an easy to make seasoned oil that can be used for a variety of recipes, such as salads, roasted potatoes, and marinades.
I originally wanted to post a series of recipes that you could prepare for the Easter holiday gathering but time got away from me and I will only have time to post a few over the next week. To start, I am posting a recipe to make Rosemary Garlic Olive Oil. This week I will be posting the recipes for Rosemary and Garlic Focaccia, Smashed Potatoes (using red and/or sweet potatoes), and Roasted Beets with Balsamic Glaze. Both recipes will utilize the Rosemary Garlic Oil.
NOTE: This oil can be made with any variety of fresh herbs, individually or in various combinations. Herbs that work well are – Thyme, Sage, and Rosemary.
1 cup Olive Oil
5 large cloves Garlic, whole with skins on
3 small sprigs Rosemary*
* If you need to wash the rosemary, be sure it is well dried before adding it to the hot oil because any water remaining on the leaves and stems will cause the oil to pop and splatter out of the pan.
Remove the leaves from two of the sprigs of Rosemary, reserving the hard stems separate from the leaves. Chop the leaves and set aside.
Heat olive oil in a stainless steel, heavy weight saucepan on medium to medium high heat. The oil should be hot but not smoking. Lower the heat to medium and carefully put the garlic, rosemary stems, and the whole rosemary sprig into the hot oil. Let the garlic and rosemary sizzle in the oil until garlic begins to turn a deep golden brown, about 3-5 minutes. Remove the pan from the heat.

Using a slotted spoon or tongs, remove garlic, rosemary stems and whole rosemary sprig. The rosemary stems can be discarded but set aside the garlic and rosemary sprig. While the oil is still hot, add chopped rosemary. The oil should still be hot enough to make the rosemary sizzle. Let the oil cool in the pan. Store oil in a glass bottle or jar to be used later.

When the garlic is cool enough to handle, remove and discard the garlic skins. The roasted garlic meats can be stored in a container in the refrigerator for up to three days and used for another recipe – i.e. spread on bread, topped on Focaccia, mashed and used in a marinade or sauce, etc.

The whole sprig of rosemary will be “crispy” when touched so the leaves will fall off the stem easily. They are actually very tasty nibbled on as is but they can be sprinkled on a dish as a finishing touch to add extra flavor. If you would like to keep these crispy, be sure to store them in an airtight container, away from moisture. They can be stored at room temperature for up to a week.
For those of you who are like me and like to have an old fashion printed copy of recipes, the below link is to a PDF (minus photos to keep it on one page).
Corned Beef Hash
March 19, 2012 § 1 Comment
St. Patrick’s Day is over and now you are left with the dilemma of what to do with your leftover “Boiled Dinner.” Your answer – Homemade Corned Beef Hash.
I have to admit that every now and then I truly enjoy eating “canned” Corned Beef Hash but there really is no comparison to homemade. Hearty pieces of corned beef, sautéed with potatoes and onions, topped with fried or poached eggs is a breakfast that you can sit and savor. Don’t make it on a day you have to rush out the door. For a change, buy the paper, spread it out on the table and enjoy your breakfast as you do the crossword (and/or Sudoku) puzzle.
One piece of advice before you prepare this recipe – Don’t cut corners and try to use up those uneaten boiled potatoes. I’ve tried it and it just doesn’t work well and it often mashes into a pulpy mess. Use the leftover potatoes to make potato salad and prepare this recipe with a fresh Russet Potato.

1 Tbls. Vegetable Oil
½ cup Sweet Onion, diced
1 large Russet Potato, diced into ¼-inch cubes
¾ cup Water, separated
1 ½ cups Leftover cooked Corned Beef, diced
2 tsp. Sweet Paprika
Black Pepper
Serve with eggs prepared to your personal preference – poached, fried, over-easy, or scrambled.
NOTE: I recommend using a non-stick frying pan for this recipe because the potatoes tend to stick to a stainless steel pan. It is certainly not required, I just find it much easier to clean and the potato pieces tend to stay whole.
In a frying pan, heat oil on medium-high heat. Add onion and sauté until edges begin to brown. Add potato to the onions and continue to sauté until potatoes begin to turn translucent (they are more opaque when raw). Add ¼ cup water, lower heat to medium, and cook covered for 3 minutes.
Remove lid and continue to sauté onion-potato mixture. Add corned beef and paprika. Sauté for 30 seconds until everything is incorporated evenly. Add ½ cup water and continue to sauté until water is absorbed but the mixture is not dry. Season with black pepper and serve with eggs.

For those of you who are like me and like to have an old fashion printed copy of recipes, the below link is to a PDF (minus photos to keep it on one page).
Chocolate Braised Beef Short Ribs
February 19, 2012 § Leave a comment
My nephew once said to me, “I don’t think you’re a Chocoholic…after all a ‘–holic’ is someone with a ‘problem’. You’re more of a…Chocolatarian…chocolate is your way of life.”
For most people, what generally comes to mind when people think about chocolate are images of truffles, steaming cups of hot cocoa, decadent cakes, and warm chocolate chip cookies. But familiar to any true Chocolotarian who has researched the origins of chocolate, it was a not always a sweet confection. The use of the cocoa bean for consumption can be dated back to 1900 BCE but it wasn’t until the 1500s that Europeans added sugar and honey to cocoa and evolved it into to the sweet treat we enjoy today.
I’ve always been intrigued with how chocolate could be used to prepare savory dishes. What I found most common was using cocoa to make Mole, which in itself is deceiving because it is a single word used for a broad array of sauces, many not using chocolate at all. But this blog post is not about Mole but using chocolate in a savory dish. The following recipe combines many of the most common spices used in Mole but adapted to work in a braised dish. The spices are combined to create a dry rub which becomes infused into the dish during the long braising time.
NOTE: I recently tried this recipe using lean stew meat and was very disappointed at the results. The dish lacked the hearty beef flavor that short ribs provide. The beef was dry, did not meld well with the herbs, and the overall flavor was surprisingly tart. There was relatively little fat to skim before serving but for this recipe stick with the fattier full flavor of the short ribs.
Chocolate Braised Beef Short Ribs (GF)
This recipe is inspired by Mole but instead of making a sauce, similar herbs are used as a dry rub. Despite the strong complex flavors of the various seasonings in this recipe, they meld together and are enhanced by the hearty flavor of the beef short ribs.
1 Tbls. Sesame Seeds, toasted and ground
2 Tbls. Cocoa Powder, unsweetened
2 Tbls. Penzey’s Chili Powder, regular [1]
1/4 tsp. Cinnamon
1/4 tsp. Coriander
1/8 tsp. Cloves
1/4 tsp. Salt and Pepper
2 Tbls. Oil, vegetable
2 slices Bacon, thick cut [2]
5 lb. Beef Short Ribs
1 Tbls. Turbinado Sugar (white or brown sugar can be substituted)
2 Shallots, sliced
2 stalks Celery, chopped
1 cup Carrots, chopped
1 28 oz. can Tomato, diced (Recommend San Marzano type.)
1 1/2 cups Cabernet Wine
1 1/2 cups Beef Broth
In a small bowl, combine sesame seeds, cocoa powder, Penzey’s chili powder, cinnamon, coriander, cloves, salt, and pepper. Rub the herb mixture onto the beef short ribs being sure to coat all surfaces well.

Preheat oven to 325°. Heat oil in a Dutch Oven or heavy stove-to-oven-safe pan. Brown bacon, being sure not to over cook (bacon should be brown and crisp but not hard or burnt). Set bacon aside and chop into ¾-inch pieces.
In the same pan, brown beef short ribs on medium-high heat but be careful not to burn the ribs or pan. After browned, lower heat to medium and sprinkle turbinado sugar onto ribs, being sure to get a little on each rib. Let sit for 1 minute to let sugar melt into meat. Remove ribs and set aside.

In the same pan, sauté shallots, celery, and carrots until vegetables look lightly glazed, about 3 minutes.

Return beef short ribs and bacon to pan. Add tomatoes, Cabernet wine, and beef broth. Bring to a boil. Cover and place pan in the center of oven. Braise for 3 hours, checking around the 2 hour mark to see if it needs more liquid. If needed, add more beef broth.

Before serving, skim fat off of top or you can make this dish a day ahead, refrigerate and remove solidified fat prior to reheating.

SERVING RECOMMENDATIONS: Serve over mashed potatoes or a smooth Polenta. The ribs have a very robust flavor so this dish generally goes best with a bland starch accompaniment.
For those of you who are like me and like to have an old fashion printed copy of recipes, the below link is to a PDF (minus photos to keep it on one page).
Chocolate Braised Beef Short Ribs (GF).pdf
* Gluten allergy and intolerance has become increasingly common. I will not go into detail about the specific symptoms, causes, or differences but I will note beside the recipe titles “(GF)” for those recipes that are gluten free. Please note that although I have labeled these recipes to be gluten free you must do your due diligence to review ingredient labels of prepared products to verify that they are truly gluten free. Also consider the side you choose to serve. In some recipes I recommend pasta or bread, which in most cases are not gluten free.
[1] I specifically used Penzey’s brand of Chili Powder because of its blend of Ancho Chili pepper, cumin, garlic, and Mexican Oregano.
[2] I recommend Wellshire Farm’s Black Forest Bacon. Remember the type and flavoring in the bacon will effect your dish. For example, if you choose a maple or heavily smoked flavored bacon it will have a significant impact on the overall flavor, which may not be bad, just an element to consider.
