Lemongrass-Cilantro-Lime Marinade (for chicken or pork)
September 13, 2016 § 2 Comments
Over the years (decades really) I’ve experimented with various herbs. My first set of cooking explorations were with dried basil. Which evolved to other dried herbs like oregano, marjoram, thyme, rosemary, sage, etc. As my cooking skills improved I moved on to fresh herbs and even grew my own. I eventually moved on to experimenting with less common culinary flavorings like rose water, sumac, and galangal. With the melting pot of produce available these days I’ve been able to explore a whole new world with fresh ingredients. My latest…Lemongrass.
I’ve always enjoyed the lemongrass flavor in southeast asian cuisine. I tried using dried lemongrass but found the flavor never truly carried through and the hard splintery pieces often ruined the texture of the food.
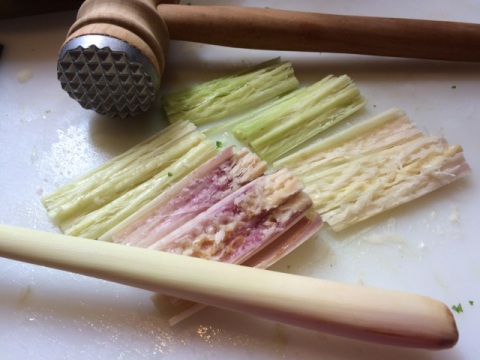
I am certainly not an expert in utilizing lemongrass but below is a recipe that I’ve made several times and the results have been consistently good. To help infuse the flavor of the lemongrass into the marinade I slice the stalks lengthwise and hammer it with a meat tenderizer. I keep the chunks big enough so any chewy strips can be easily picked out.
NOTE: I like to serve this with two toppings – a fresh chopped herb combination and fried shallots (recipes below). You can also spice-up this dish with Korean Bi Bim Bap sauce as a condiment.
Lemongrass-Cilantro-Lime Marinade (for chicken or pork)
MARINADE:
¼ cup Lime Juice
2 Tbls. Fish Sauce
1 Tbls. Soy Sauce (use gluten free soy to make this a GF recipe)
1 Tbls. Sherry or Brandy
1 tsp. Brown Sugar
1 Tbls. Garlic, chopped
2 Tbls. Cilantro, fresh chopped
1 Tbls. Scallions, chopped
1 stalk Lemongrass, fresh crushed*
White Pepper
1 to 1 ½ lb. Chicken, boneless breasts or thighs
or
1 rack Pork Baby Back Ribs
or
1½ to 2 lb. Country Style Ribs, or bone-in pork chops
* Crush lemongrass by slicing stalks into 3-4 inch pieces, then slice them lengthwise and hammer it with a meat tenderizer. This will help the flavor blend into the marinade better.
Marinade – In a bowl, combine lime juice, fish sauce, soy sauce, sherry or brandy, brown sugar, garlic, cilantro, scallions, lemongrass, and white pepper.

Pour mixture on meat, coating well. Place chunks of lemongrass between meat to help the flavor disperse. Let it marinate at least 1 hour to overnight.
Grill meat – Grill chicken on medium high heat with an open lid. Meat should be browned and cooked through. Thin pieces generally cook in 10-15 minutes.

Grill ribs on low heat with a covered lid. Depending on the thickness of the ribs, it will take about 20-30 minutes on each side. Monitor grilling because fatty areas of ribs may cause flame to flair and cause charring of ribs.

Alternately, chicken can be cooked using a grill pan and ribs can be baked in an oven.
TOPPING 1: FRESH HERBS
¼ cup Basil, fresh chopped
¼ cup Cilantro, fresh chopped
¼ cup Mint, fresh chopped
1 Tbls. Scallions, chopped (optional)
In a bowl, combine basil, cilantro, mint, and scallions, stirring herbs until they are mixed evenly.
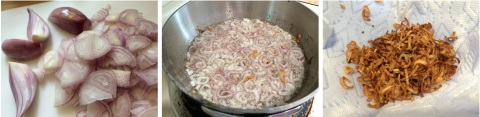
TOPPING 2: FRIED SHALLOTS
2 lg. Shallots, sliced
1 cup Vegetable Oil (or Canola)
Heat oil in small pan so oil is about ½-inch deep. Carefully add 1/3 of shallots into hot oil and cook until light brown. Remove cooked shallots with slotted spoon onto paper towel. Repeat with each third. Shallot flavored oil can be saved for use in other dishes.
Serving suggestions – Serve meat on cooked sushi or long-grain rice. Sprinkle herb mixture and fried shallots on top. If you like a hot kick to the dish, add Korean Bi Bim Bap sauce (seasoned red pepper paste). You can also make a side dish of Spicy Cucumbers – Slice cucumbers tossed in some Bi Bim Bap sauce.
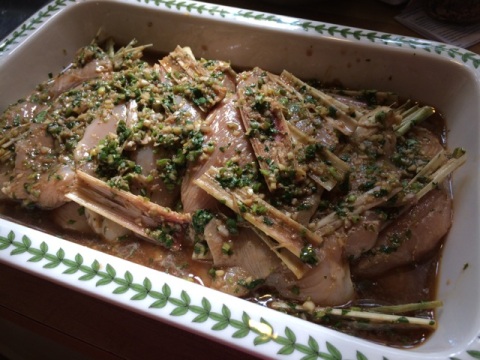
NOTE: Below is a photo of the ribs without fried shallots. I forgot to take a plated photo of the chicken version (sorry).

Nostalgia
July 15, 2016 § Leave a comment
When I started this blog it was all about creating new memories of warmth and familial bonds. Many of my recipes take time to prepare – time to infuse your passion into each herb you chop, each concoction of ingredients you stir, each pot of simmering elixir wafting through your home. Today I want to step back in time when something simple and obvious was exciting and new…
I won’t say what year it was but I was 14. I was thinking of becoming a nurse so I decided to volunteer at the local town hospital to see what it might be like. To give you some perspective of time let’s just say I was called a candy striper. Regular duties would include helping at the front desk, sorting internal mail, delivering flowers to patients, and sometimes helping out in the cafe (not the large cafeteria but the little cafe that patient visitors would often go to if they need a cup of coffee or a small bite and some quiet time).
I always felt at home in a kitchen so I loved helping out in the cafe. The customers in the cafe were people who were visiting their sick loved ones. Usually tired and emotionally drained. Some had been sleeping in a chair all night. They wanted a quiet place to refresh themselves. That’s where volunteers like me stepped in. We weren’t there for the tips. We served them coffee and gave them a smile.
The cafe served simple fare – coffee & tea, donuts, eggs & bacon, and sandwiches. When I say sandwiches I don’t mean what you would find now-a-days like grilled panini’s, banh mi sandwich, or even a foot-long hero. They served ham and cheese, turkey and cheese, egg salad, and something I had never heard of…ham salad.
I know, you’re thinking “Seriously? This blog is actually about ham salad?” Well, yes but it’s also so much more. This simple concoction of chopped ham and pickles was something I never had in my then, 14 long years of life! It was new and exciting. Sure, I had plain ham before but not this combination of sweet and salty and sour and soft and crunchy all at the same time goodness!
To this day, every time I have leftover baked ham I have to make ham salad. Maybe it’s the taste, maybe it’s the memories. Maybe it’s because it brings me back to a time when the simple act of pouring someone a cup of hot coffee and handing them a sandwich with a smile could make a difference.

The head chef in the cafe I’m sure thought it was quite hysterical that this little girl was so fascinated with how to make ham salad. If I recall correctly his recipe was – chopped ham, relish, and mayonnaise. Over the years I’ve improvised. I vary between chopped Dill or Bread and Butter pickles. I sometimes add fresh herbs. I’ve tried different types of mustard to give it a little spicy kick. The one thing I always do…I never measure my ingredients. So here is a basic recipe that can be improvised to your personal taste.
Ham, chopped
Pickles, chopped (Dill or Bread and Butter is recommended)
Mayonnaise
Dijon Mustard
Dash of Worcestershire Sauce
Sprinkle of dried Dill
Ground Black Pepper
Chop pickles and ham to 1/8-inch pieces.

Place all ingredients in a bowl and combine well.

My first ham salad sandwich was made with cloud soft Wonder Bread. As my recipe evolved so have the many ways I consume this simple salad. As photographed above, any type of bread works but it’s not only for sandwiches now…
Ham Salad on Salad.
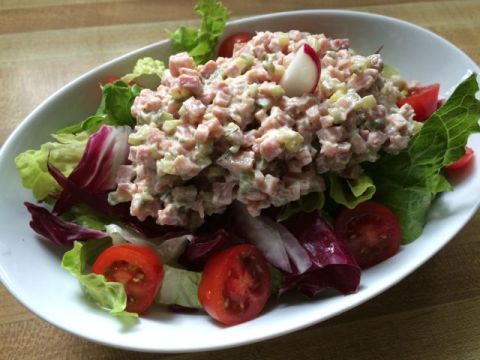
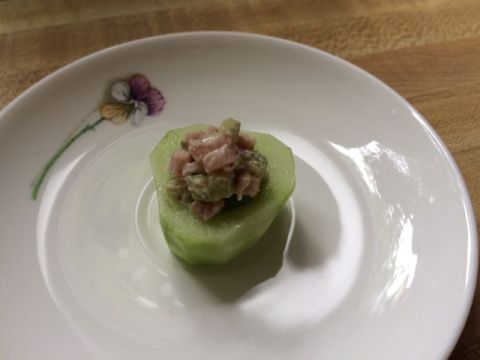
Ham Salad in Cucumber Cups.
Ham Salad in Lettuce Wraps.

Ham Salad in Tomato Cups.
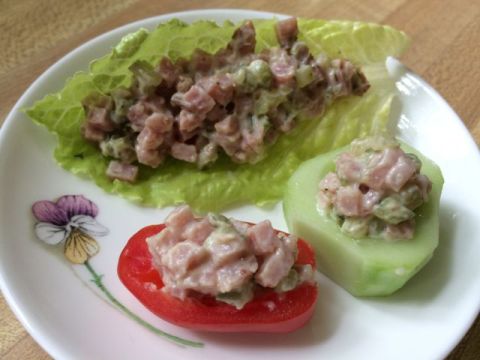
Always served (and eaten) with a smile.
Rosemary and Garlic Focaccia
April 6, 2012 § 2 Comments
There is something heavenly about the smell of fresh baked bread. Add herbs and garlic to that and you begin to wonder if the smell is heavenly or sinfully good. This recipe for Rosemary and Garlic Focaccia will produce a flavorful bread with a pillow soft texture. The dough is prepared in a bread machine but it is baked in the oven.

This recipe is adapted from Thyme Focaccia and Parmesan Focaccia on Epicurious’s website. These directions utilize a bread machine to make the dough. If you do not have a bread machine, please refer to the Epicurious recipe for directions to make dough using a standing electric mixer.
SPECIAL EQUIPMENT: Bread machine.
2 ¼ cups water, warm (105°‐115° F)
1/3 cup Olive Oil
5 cups Bread Flour, plus some when rolling out dough
5 tsp. Active Dry Yeast (or two ¼ oz. pkgs.)
1 tsp. Sugar
1 tsp. Salt
2 Tbls. Olive Oil
2 Tbls. Cornmeal
¼ cup Rosemary Garlic Olive Oil
Roasted Rosemary leaves and Garlic from making Rosemary Garlic Oil*
Coarse Salt and freshly ground Black Pepper
* This Focaccia recipe is a great way to utilize the garlic and rosemary that is used to make the Rosemary Garlic Oil but fresh rosemary and garlic could also be used. Just note that the flavors will be slightly sharper using fresh versus cooked.

Roasted rosemary and garlic from making Rosemary Garlic Oil
NOTE: If your bread machine specifies a particular method to adding ingredients, follow the directions of your machine. My bread machine is a Williams-Sonoma brand and recommends adding liquids first, followed by flour, then other dry ingredients.
Pour warm water and olive oil into bread machine pan. Be aware that the temperature of the oil will affect the temperature of the water, so if the oil is slightly cool, you should have your water on the warmer side.
Carefully add the flour to the pan, trying to get the flour to float on top of the liquid but cover the surface so you can no longer see the liquid.
In the center of the pan, where the paddle will mix the dough, make an indent in the flour and add the yeast.
In one corner, add the sugar and in another corner add the salt.
Set the bread machine to just mix the dough and warm to first rising. Be sure that the machine will not mix the dough for the second rising or cook the dough. This process generally will take 1 to 1 ½ hours depending on the bread machine.
NOTE: Remove the bread promptly when the bread machine signals completion. This dough rises easily. In the photo below, I let the dough sit for an extra half hour. As you can see, the dough rises beautifully but it was quite a mess…

While dough is being made, prepare an 15 ½”x10” stoneware bar pan (I use the Pampered Chef Stoneware Large Bar Pan) by brushing with 2 Tbls. olive oil, then sprinkle with 2 Tbls. Cornmeal. Alternately, you can make 2 smaller loaves. Set pans aside in a warm place (cold pans will inhibit the second rising).
The prepared dough will be very soft and moist. Remove dough from bread machine and pour out onto a floured surface. Do not knead dough. Using floured hands, press dough flat to about 1-inch thick. Fold dough into thirds. Press lightly and turn 90-degrees. Fold dough into thirds again.

NOTE: The purpose of the folding is to create layers in the dough. During the second rising fine air pockets will form and the dough will become lighter and fluffier when cooked.
Using a rolling pin, roll dough into a flat rectangular shape, slightly larger than the pan. Carefully transfer dough from table surface into prepared pan, pushing the dough into the pan around the sides so it fills the whole pan. Don’t worry about wrinkles in the dough. Brush the dough with the Rosemary Garlic Olive Oil. Top the Focaccia with roasted rosemary leaves and slices of roasted garlic. Lastly, sprinkle coarsely ground salt and pepper. Set aside in a warm place for 30 minutes for second rising.

Preheat oven to 400° (375° if your oven runs hot) Using your finger, press indents about every 3-4 inches apart all over bread. Bake the bread for 12-14 minutes.
SERVING SUGGESTIONS: Try this focaccia with a drizzle of Rosemary Garlic Oil and Balsamic Glaze. Top slices of rosemary and garlic focaccia with goat cheese, roasted beets, and chives.

For those of you who are like me and like to have an old fashion printed copy of recipes, the below link is to a PDF (minus photos to keep it on one page).
Chocolate Braised Beef Short Ribs
February 19, 2012 § Leave a comment
My nephew once said to me, “I don’t think you’re a Chocoholic…after all a ‘–holic’ is someone with a ‘problem’. You’re more of a…Chocolatarian…chocolate is your way of life.”
For most people, what generally comes to mind when people think about chocolate are images of truffles, steaming cups of hot cocoa, decadent cakes, and warm chocolate chip cookies. But familiar to any true Chocolotarian who has researched the origins of chocolate, it was a not always a sweet confection. The use of the cocoa bean for consumption can be dated back to 1900 BCE but it wasn’t until the 1500s that Europeans added sugar and honey to cocoa and evolved it into to the sweet treat we enjoy today.
I’ve always been intrigued with how chocolate could be used to prepare savory dishes. What I found most common was using cocoa to make Mole, which in itself is deceiving because it is a single word used for a broad array of sauces, many not using chocolate at all. But this blog post is not about Mole but using chocolate in a savory dish. The following recipe combines many of the most common spices used in Mole but adapted to work in a braised dish. The spices are combined to create a dry rub which becomes infused into the dish during the long braising time.
NOTE: I recently tried this recipe using lean stew meat and was very disappointed at the results. The dish lacked the hearty beef flavor that short ribs provide. The beef was dry, did not meld well with the herbs, and the overall flavor was surprisingly tart. There was relatively little fat to skim before serving but for this recipe stick with the fattier full flavor of the short ribs.
Chocolate Braised Beef Short Ribs (GF)
This recipe is inspired by Mole but instead of making a sauce, similar herbs are used as a dry rub. Despite the strong complex flavors of the various seasonings in this recipe, they meld together and are enhanced by the hearty flavor of the beef short ribs.
1 Tbls. Sesame Seeds, toasted and ground
2 Tbls. Cocoa Powder, unsweetened
2 Tbls. Penzey’s Chili Powder, regular [1]
1/4 tsp. Cinnamon
1/4 tsp. Coriander
1/8 tsp. Cloves
1/4 tsp. Salt and Pepper
2 Tbls. Oil, vegetable
2 slices Bacon, thick cut [2]
5 lb. Beef Short Ribs
1 Tbls. Turbinado Sugar (white or brown sugar can be substituted)
2 Shallots, sliced
2 stalks Celery, chopped
1 cup Carrots, chopped
1 28 oz. can Tomato, diced (Recommend San Marzano type.)
1 1/2 cups Cabernet Wine
1 1/2 cups Beef Broth
In a small bowl, combine sesame seeds, cocoa powder, Penzey’s chili powder, cinnamon, coriander, cloves, salt, and pepper. Rub the herb mixture onto the beef short ribs being sure to coat all surfaces well.

Preheat oven to 325°. Heat oil in a Dutch Oven or heavy stove-to-oven-safe pan. Brown bacon, being sure not to over cook (bacon should be brown and crisp but not hard or burnt). Set bacon aside and chop into ¾-inch pieces.
In the same pan, brown beef short ribs on medium-high heat but be careful not to burn the ribs or pan. After browned, lower heat to medium and sprinkle turbinado sugar onto ribs, being sure to get a little on each rib. Let sit for 1 minute to let sugar melt into meat. Remove ribs and set aside.

In the same pan, sauté shallots, celery, and carrots until vegetables look lightly glazed, about 3 minutes.

Return beef short ribs and bacon to pan. Add tomatoes, Cabernet wine, and beef broth. Bring to a boil. Cover and place pan in the center of oven. Braise for 3 hours, checking around the 2 hour mark to see if it needs more liquid. If needed, add more beef broth.

Before serving, skim fat off of top or you can make this dish a day ahead, refrigerate and remove solidified fat prior to reheating.

SERVING RECOMMENDATIONS: Serve over mashed potatoes or a smooth Polenta. The ribs have a very robust flavor so this dish generally goes best with a bland starch accompaniment.
For those of you who are like me and like to have an old fashion printed copy of recipes, the below link is to a PDF (minus photos to keep it on one page).
Chocolate Braised Beef Short Ribs (GF).pdf
* Gluten allergy and intolerance has become increasingly common. I will not go into detail about the specific symptoms, causes, or differences but I will note beside the recipe titles “(GF)” for those recipes that are gluten free. Please note that although I have labeled these recipes to be gluten free you must do your due diligence to review ingredient labels of prepared products to verify that they are truly gluten free. Also consider the side you choose to serve. In some recipes I recommend pasta or bread, which in most cases are not gluten free.
[1] I specifically used Penzey’s brand of Chili Powder because of its blend of Ancho Chili pepper, cumin, garlic, and Mexican Oregano.
[2] I recommend Wellshire Farm’s Black Forest Bacon. Remember the type and flavoring in the bacon will effect your dish. For example, if you choose a maple or heavily smoked flavored bacon it will have a significant impact on the overall flavor, which may not be bad, just an element to consider.
Casserole-Roasted Chicken with Tarragon (GF) and Casserole-Roasted Chicken with Lemon Rosemary and Thyme
February 5, 2012 § 1 Comment
Butter vs. Olive Oil – Casserole-Roasted Chicken
When I was young I was equally fascinated watching Julia Child as much as Sesame Street on PBS. It was the beginning of my fascination with cooking in the French style. If you have ever prepared any of Julia Child’s recipes you will see 2 common ingredients: lardons (fatty bacon) and butter. She also lived to be 91 so I have no comment about the health implications of such a diet. But many of us can only consume so much butter and pork fat on a day-to-day basis.
This post is not about the health benefits of cooking with one fat verses another. It is simply an experiment to compare the culinary results of using butter versus olive oil to prepare a casserole-roasted chicken. A chicken cooked in this fashion is tender and succulent, with a delicate aromatic flavor, but sometimes you just want an alternative to using a stick of butter.
Putting aside flavor, a significant difference between cooking with butter versus olive oil is the smoking temperature. This is the temperature at which the cooking oil will break down and produce an acrid smoke. For butter, that temperature is 300 degrees, where as olive oil has a much higher threshold of 375 degrees.
What this signifies is that butter, while less tolerant to high heat, will also brown what you are cooking more quickly. The following photo is an example of the browning results between the two oils.

Left: Chicken seared in butter Right: Chicken seared in olive oil.
As for the flavor and consistency of preparing the chicken in butter versus olive oil, both chickens came out equally tender and succulent but obviously projected the unique flavor attributes of the cooking fat. The chicken roasted with butter has a rich, almost creamy-smooth texture and flavor. The olive oil roasted chicken also has a rich quality and smooth texture but not the same creaminess as the butter roasted chicken.
Below are two recipes, Casserole-Roasted Chicken with Tarragon, which requires butter and Casserole-Roasted Chicken with Lemon Rosemary and Thyme, which requires olive oil. I opted to post two separate recipes instead of using a single recipe prepared separately using the two oils because I felt the flavor of butter melded better with tarragon and olive oil was enhanced with Mediterranean seasoning. I wouldn’t place one recipe superior to the other but try it for yourself to compare…
Casserole-Roasted Chicken with Tarragon – butter recipe
This recipe is inspired by Julia Child’s Poulet Poêle À L’Estragon. (Sorry Julia, I do not truss my chicken for my Tarragon Chicken recipe). I have followed her recipe exactly and I do admit that the breast meat of the chicken is a bit juicier when the bird is trussed. Also, if you would like to serve your chicken intact you will need to truss the bird and increase the cooking time in this recipe by approximately 10 minutes. If you do not truss the chicken, as I do in this recipe, the legs will fall loose when you pick it up out of the pan. I prefer to carve the bird prior to serving so it’s not important to me to have the bird in one piece. For personal taste I add garlic and increased the vegetables used in this recipe.
1 whole 3-5 lb Roasting Chicken
4 Tbls. Butter, separated
1 tsp. Tarragon, dried (2 tsp. chopped fresh)
Salt and Pepper
1 Tbls. Vegetable Oil
1 cup Sweet Onion, diced
1 – 8 oz. bag (½ lb) Baby Carrots or sliced regular carrots
5 cloves garlic, whole with skins on
½ tsp. Tarragon, dried (1 tsp. chopped fresh)
1 cup Chicken Broth
½ Tbls. Cornstarch
1 Tbls. Marsala
¼ tsp. Tarragon (½ tsp. chopped fresh)
Brush 2 tablespoons melted butter on the outside and inside of the chicken. Then sprinkle the tarragon, salt and pepper on the outside and inside of the chicken.

Preheat oven to 325°. Melt 2 tablespoons butter and vegetable oil in a Dutch Oven or heavy stove-to-oven-safe pan. Brown the chicken on all sides, starting with the breast side first. Remove chicken to a platter.

In the same pan, sauté onions, carrots, garlic, and ½ teaspoon tarragon for 3-5 minutes. Return the chicken to the pan, breast side up. Using a bulb baster, baste the chicken with the liquid in the pan, squirting juice into the chicken cavity as a last step. Cover chicken with a piece of aluminum foil, then cover with the pan lid. Bake 35 minutes for a 3 lb chicken, 45 minutes for a 5 lb chicken. The chicken is done when the drumstick moves in their sockets.

NOTE: The length of time to cook will vary based on the type of pan or dish you are using. The time I recommend is based on using a heavy non-stick cast iron pan. Julia Child recommends 1 hour 10 minutes for a chicken weighing 3 lb and 1 hour 30 minutes for a 5 pounder, which I found to be too long. Her lengthier time is probably due to her chicken being trussed and the recipe was written in 1961, when it was more common to cook poultry well-done.

Remove chicken to a platter. Skim off excess oil in pan. Remove garlic to a small plate. Remove the garlic skins and using the tines of a fork, mash garlic into a paste. Return garlic paste to the pan and stir into juices. Add chicken broth to pan and bring the mixture to a boil on the stovetop. Combine cornstarch and Marsala in a small bowl. Stir cornstarch mixture into pan, mixing well to prevent lumpiness. Add ¼ teaspoon tarragon and simmer for 3 minutes to let herb flavor meld into sauce. (See recipe below for Casserole-Roasted Chicken with Lemon Rosemary and Thyme for images of making garlic paste and sauce)

SERVING RECOMMENDATIONS: Carve chicken per your own preference and pour sauce and vegetables over chicken. This recipe is great with roasted or mashed potatoes or rice pilaf.
For those of you who are like me and like to have an old fashion printed copy of recipes, the below link is to a PDF (minus photos to keep it on one page).
Casserole-Roasted Chicken with Tarragon.pdf
Casserole-Roasted Chicken with Lemon Rosemary and Thyme – olive oil recipe
This recipe is prepared identically to my recipe for Casserole-Roasted Chicken with Tarragon, which was inspired by Julia Child’s Poulet Poêle À L’Estragon. But I wanted to experiment using olive oil instead of butter, which compelled me to use Mediterranean herbs.
1 whole 3-5 lb Roasting Chicken
½ Lemon
1 tsp. Rosemary, fresh
1 tsp. Thyme, fresh
Salt and Pepper
1 Tbls. Honey
2 Tbls. Sherry
5 Tbls. Olive Oil, separated
5 cloves garlic, whole with skins on
1 cup Chicken Broth
½ Tbls. Cornstarch
1 Tbls. Sherry
Squeeze out the juice of half a lemon into a small bowl and set aside. Rub the chicken skin and inside of the cavity with the remaining lemon skin/rind. In the bowl of lemon juice, add honey, sherry and 2 tablespoons olive oil. Brush the mixture outside and inside of the chicken. Sprinkle the rosemary, thyme, salt, and pepper outside and inside of the chicken.

Preheat oven to 325°. Heat 3 tablespoons olive oil in a Dutch Oven or heavy stove-to-oven-safe pan. Brown the chicken on all sides, starting with the breast side first. Add garlic. Cover chicken with a piece of aluminum foil, then cover with pan lid. Bake – 35 minutes for a 3 pound chicken, 45 minutes for a 5 pound chicken. The chicken is done when the drumstick moves in their sockets.

NOTE: The length of time to cook will vary based on the type of pan or dish you are using. The time I recommend is based on using a heavy non-stick cast iron pan. Julia Child recommends 1 hour 10 minutes for a chicken weighing 3 lb and 1 hour 30 minutes for a 5 pounder, which I found to be too long. Her lengthier time is probably due to her chicken being trussed and the recipe was written in 1961, when it was more common to cook poultry well-done.
Remove chicken to a platter. Skim off excess oil in pan. Remove garlic to a small plate. Remove the garlic skins and using the tines of a fork, mash garlic into a paste. Return garlic paste to the pan and stir into juices. Add chicken broth to pan and bring the mixture to a boil on the stovetop. Combine cornstarch and Sherry in a small bowl. Stir cornstarch mixture into pan, mixing well to prevent lumpiness. Add a pinch of fresh rosemary and thyme to sauce.


SERVING RECOMMENDATIONS: Carve chicken per your own preference and pour sauce over chicken. This recipe is great with roasted or mashed potatoes, egg noodles, or rice pilaf.
For those of you who are like me and like to have an old fashion printed copy of recipes, the below link is to a PDF (minus photos to keep it on one page).
Casserole-Roasted Chicken with Lemon Rosemary and Thyme.pdf
* Gluten allergy and intolerance has become increasingly common. I will not go into detail about the specific symptoms, causes, or differences but I will note beside the recipe titles “(GF)” for those recipes that are gluten free. Please note that although I have labeled these recipes to be gluten free you must do diligence to review ingredient labels of prepared products to verify that they are truly gluten free. Also consider the side you choose to serve. In some recipes I recommend pasta or bread, which in most cases are not gluten free.
Balsamic Braised Beef Short Ribs
January 13, 2012 § 2 Comments
Quite a few years ago my sister-in-law was kind enough to give my husband and me a gift certificate to have lunch or Tea at Fauchon in New York City (sadly they are no longer there). We opted to have lunch. Our meals came out and the waitress placed in front of my husband a small white plate with two dainty croissant sandwiches on it. As for me, I had a hearty, steaming bowl of cassolette with a thick chunk of crispy baguette. My husband looked at me and said, “Yup, that’s my girl.”
Why am I sharing this story with you? Because I am once again posting a rich decadent recipe that would be served at the finest of French Bistros – Balsamic Braised Beef Short Ribs. I can’t help myself, its winter here and there is nothing more comforting to me than the aroma of braising meat, rich with seasoning wafting from the oven.
To the novice consumer of beef ribs it is easy to become confused with what you find at an average market. Many stores will label all beef rib cuts “Beef Ribs” but there are distinct differences between the ribs carved from the upper portion vs. the lower portion. For example, the Back Rib, which runs along the side of the Ribeye Steak are usually carved 6 to 8-inches long and have very little meat except what is found between the bones. But the cut we’re interested in for braising is the Short Rib, which is generally 3 to 5-inches in length and has a nice thick marbled piece of meat along one side of the bone. Short Ribs run along the Flank Steak and Brisket.
Short Ribs are the ideal cut for braising but the meat along the rib is wonderful cooked medium-rare. Some markets will sell Boneless Short Rib Steaks that are great grilled with an Asian marinade or smothered in garlic, olive oil, and herbs. I’ll probably get into that more in the summer…
For this recipe, select ribs that have a nice size chunk of meat on one side of the bone (1-2 inches of meat). They should also be nicely marbled but not overly fatty.

If you can’t drink it…don’t use it…
When I first started cooking with wine I would buy cheap “cooking wine” that you find on the same shelf as vinegar in the grocery store. I didn’t need to be of legal drinking age as it wasn’t real wine to begin with. When cooking with wine, select one that you would enjoy sipping with your meal. The flavor of the wine will carry through to the final product so you could make the recipe exactly the same way but use two different wines and end up with two very different results.
The same holds true with Balsamic Vinegar. If the vinegar you use in this recipe is very tart and acidic the flavor will carry through. If the vinegar is very sweet or mild flavored, the wine and beef will dominate the taste, which defeats the purpose of using Balsamic Vinegar in the first place.
Balsamic Braised Beef Short Ribs (GF)
5 lbs Beef Short Ribs
Salt and Pepper
2 Tbls. Olive Oil
1 ½ tsp. Turbinado Sugar (white or brown sugar can be substituted)
8 oz bag (½ lb) Baby Carrots
2 Celery Stalks, chopped
7 large cloves Garlic, whole with skins on
½ cup Balsamic Vinegar
1 cup Red Wine, such as Zinfandel or Cabernet Sauvignon
2 cups Beef Broth, plus 1-2 cups more if there is a lot of evaporation
1-2 stems Rosemary, fresh or 2 tsp. dried
2-4 sprigs Thyme, fresh or 2 tsp. dried
2 Bay Leaves
½ Tbls. Butter
1 pkg. (8 oz) Baby Bella Mushrooms, cut into quarters
Salt and pepper short ribs. Heat olive oil in Dutch Oven or heavy stove-to-oven-safe pan. Be careful not to over-heat, as olive oil will burn at a lower temperature than regular vegetable oil. Sear the shanks until nicely browned. Sprinkle ribs with turbinado sugar. Let ribs sit in pan 1-3 more minutes to let sugar melt into meat. Transfer ribs to a platter.
Preheat oven to 325°. If there is a lot of oil in the pan remove some, leaving about 2-3 Tbls. Add carrots, celery, and garlic. Sauté until veggies are lightly golden and glazed. At this point the skins on the garlic should pop off. Remove and discard the garlic skins.

Return ribs to pan. Pour Balsamic vinegar over ribs, being sure to drizzle a little onto each rib. Let vinegar boil lightly in pan for about 3 minutes until the pungent scent of vinegar dissipates. Add wine and broth. Sprinkle rosemary, thyme, and bay leaves on top. When mixture comes to a full boil, cover and put into oven. Braise ribs in oven for 2 hours (NOTE: this is just a checking point, ribs will need to braised another hour).

In a sauté pan melt butter, than add mushrooms and sauté for 3-5 minutes. Add mushrooms to ribs. At this time add 1-2 cups more beef broth (amount of liquid will depending on how much sauce you would like for the final product). Continue to cook in oven for another hour. Total time in the oven is 3 hours.
Remove ribs from oven and skim off some of the oil from the pan.
SERVING RECOMMENDATIONS: Serve over egg noodles* or with mashed potatoes. The ribs have a nice robust flavor so this dish generally goes best with a bland starch accompaniment.
For those of you who are like me and like to have an old fashion printed copy of recipes, the below link is to a PDF (minus photos to keep it on one page).
Balsamic Braised Beef Short Ribs.pdf
* Gluten allergy and intolerance has become increasingly common. I will not go into detail about the specific symptoms, causes, or differences but I will note beside the recipe titles “(GF)” for those recipes that are gluten free. Please note that although I have labeled these recipes to be gluten free you must do diligence to review ingredient labels of prepared products to verify that they are truly gluten free. Also consider the side you choose to serve. In some recipes I recommend pasta or bread, which in most cases are not gluten free.
Lamb Shanks with White Beans and Gremolata
January 4, 2012 § 3 Comments
There’s nothing quite like coming into a home after being out on a cold winter day and becoming enveloped in the rich aroma of a braised roast. This dish can be a one pot meal but I usually like to have it with mashed potatoes or a crispy baguette* and a palate cleansing salad on the side.
Lamb Shanks can vary greatly in size, from a half to full pound each. In the US you have the choice of domestically raised sheep or imported from Australia and New Zealand. Those with a delicate palate can tell the difference but in general, domestic sheep tend to be a larger sheep and a little milder in flavor. Whereas Australian and New Zealand sheep tend to be smaller and more earthy flavored. The size and flavor is generally contributed to the sheep’s diet – American sheep are grain fed, thus making them larger in size and milder in flavor, where as Australian and New Zealand sheep are grass fed, making them smaller in size and giving the meat their distinctive earthy flavor. One is not better than the other, it is merely personal preference. I have used domestic and imported lamb and both provide pleasing results in this recipe.
Comments on serving: After braising for 3 hours the meat will melt off of the bone but it will usually stay on the bone until gently pulled off with your fork. I generally estimate one shank per person, although if they are a full pound per shank it will probably be more than one average person can eat. The presentation of a whole lamb leg smothered in the braised beans and veggies, sprinkled with the colorful Gremolata is simply tantalizing. But sometimes it is more practical to pull the meat off the bone and serve it like a stew. Either way, its flavor will linger on your tongue and create fond memories.
Lamb Shanks with White Beans and Gremolata

Lamb Shank, served on the bone, with mashed potatoes, and steamed French beans. On the side is a salad of baby romaine, topped with red onion and Comice pear and a light balsamic vinaigrette.
Note: Dried herbs are listed in this recipe. If you choose to use fresh herbs adjust teaspoon measurements to tablespoons.
3-4 (about 3-3 1/2 lbs) Lamb Shanks
1 tsp. Rosemary, dried ground
1 tsp. Thyme, dried
Salt and Pepper
2 Tbs. Olive Oil
1 sm. Sweet Onion, chopped
1 Celery Stalk, chopped
2 Carrots, peeled and sliced (Shape and size is personal preference. Baby carrots from a bag work well too.)
9 Garlic Cloves, whole (You can leave skins on, they will pop off when they are sautéed.)
1 1/2 cups Red Wine such as Côtes-du-Rhône, Cabernet Sauvignon or Chianti
2 1/2 cups Chicken Broth
3 Tbs. Tomato Paste
1 can (28 oz.) Chopped Tomatoes (Recommend San Marzano type.)
1 tsp. Thyme, dried
1 Bay Leaf
1 can (15 oz.) Cannellini Beans (White Kidney Beans)
Gremolata:
1/2 cup Flat-Leaf Parsley, fresh minced
Grated zest of 1 Lemon
Grated zest of 1 Orange
1 Garlic Clove, finely minced
1/2 tsp. each, Salt and Pepper
Preheat oven to 325°. Rub Rosemary, Thyme, Salt, and Pepper onto Lamb Shanks. Heat 2 Tbls. Olive Oil in a Dutch Oven or heavy stove-to-oven-safe pan[1]. Be careful not to over-heat as olive oil will burn at a lower temperature than regular vegetable oil. Sear the shanks until nicely browned. Transfer to a platter.

If there is a lot of oil in the pan, remove some, leaving about 3-4 Tbls. Sauté Onion, Celery, Carrots, and Garlic until nicely glazed, about 3-5 minutes.

Return Lamb Shanks to pan and add Red Wine and Chicken Broth. Bring to a full boil and add Tomato Paste, stirring it into the liquid until it dissolves. Add Tomatoes, Thyme, and Bay Leaf.

Cover and place into a heated 325° oven and bake for 2 hours. Add Cannellini Beans and add more liquid if needed. Continue brazing for ½ to 1 more hour (total time 2 ½ to 3 hours).
To make Gremolata: Combine Parsley, Lemon and Orange zest, Garlic, Salt, and Pepper in a bowl. Sprinkle Gremolata onto Lamb Shanks when served (amount is personal preference).
Note about Gremolata: Leftover Gremolata is great rubbed onto chicken (whole roaster, split breasts, or leg pieces). Simply rub onto raw chicken, sprinkle with salt and pepper and bake. Another use is to saute shrimp in olive oil until just done. Toss cooked shrimp, cooked pasta (any shape, Orzo is great too), red onion, red bell pepper, and Gremolata in a bowl.

For those of you who are like me and like to have an old fashion printed copy of recipes, the below link is to a PDF (minus photos to keep it on one page).
Lamb Shanks with White Beans and Gremolata.pdf
[1] I’ve made this recipe in a larger volume and seared the shanks in a pan but roasted in a large roasting pan covered with foil. Just be aware that the liquid may evaporate quicker so you may need to add more broth or water during the braising time.
* Gluten allergy and intolerance has become increasingly common. I will not go into detail about the specific symptoms, causes, or differences but I will note beside the recipe titles “(GF)” for those recipes that are gluten free. Please note that although I have labeled these recipes to be gluten free you must do diligence to review ingredient labels of prepared products to verify that they are truly gluten free. Also consider the side you choose to serve. In some recipes I recommend pasta or bread, which in most cases are not gluten free.
