Nostalgia
July 15, 2016 § Leave a comment
When I started this blog it was all about creating new memories of warmth and familial bonds. Many of my recipes take time to prepare – time to infuse your passion into each herb you chop, each concoction of ingredients you stir, each pot of simmering elixir wafting through your home. Today I want to step back in time when something simple and obvious was exciting and new…
I won’t say what year it was but I was 14. I was thinking of becoming a nurse so I decided to volunteer at the local town hospital to see what it might be like. To give you some perspective of time let’s just say I was called a candy striper. Regular duties would include helping at the front desk, sorting internal mail, delivering flowers to patients, and sometimes helping out in the cafe (not the large cafeteria but the little cafe that patient visitors would often go to if they need a cup of coffee or a small bite and some quiet time).
I always felt at home in a kitchen so I loved helping out in the cafe. The customers in the cafe were people who were visiting their sick loved ones. Usually tired and emotionally drained. Some had been sleeping in a chair all night. They wanted a quiet place to refresh themselves. That’s where volunteers like me stepped in. We weren’t there for the tips. We served them coffee and gave them a smile.
The cafe served simple fare – coffee & tea, donuts, eggs & bacon, and sandwiches. When I say sandwiches I don’t mean what you would find now-a-days like grilled panini’s, banh mi sandwich, or even a foot-long hero. They served ham and cheese, turkey and cheese, egg salad, and something I had never heard of…ham salad.
I know, you’re thinking “Seriously? This blog is actually about ham salad?” Well, yes but it’s also so much more. This simple concoction of chopped ham and pickles was something I never had in my then, 14 long years of life! It was new and exciting. Sure, I had plain ham before but not this combination of sweet and salty and sour and soft and crunchy all at the same time goodness!
To this day, every time I have leftover baked ham I have to make ham salad. Maybe it’s the taste, maybe it’s the memories. Maybe it’s because it brings me back to a time when the simple act of pouring someone a cup of hot coffee and handing them a sandwich with a smile could make a difference.

The head chef in the cafe I’m sure thought it was quite hysterical that this little girl was so fascinated with how to make ham salad. If I recall correctly his recipe was – chopped ham, relish, and mayonnaise. Over the years I’ve improvised. I vary between chopped Dill or Bread and Butter pickles. I sometimes add fresh herbs. I’ve tried different types of mustard to give it a little spicy kick. The one thing I always do…I never measure my ingredients. So here is a basic recipe that can be improvised to your personal taste.
Ham, chopped
Pickles, chopped (Dill or Bread and Butter is recommended)
Mayonnaise
Dijon Mustard
Dash of Worcestershire Sauce
Sprinkle of dried Dill
Ground Black Pepper
Chop pickles and ham to 1/8-inch pieces.

Place all ingredients in a bowl and combine well.

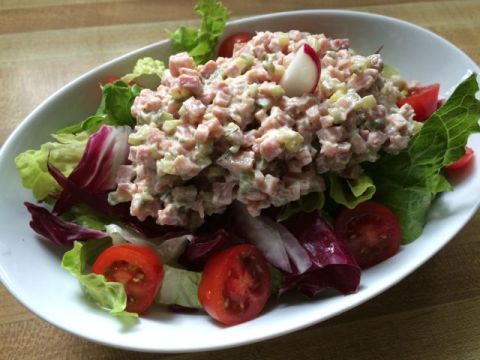
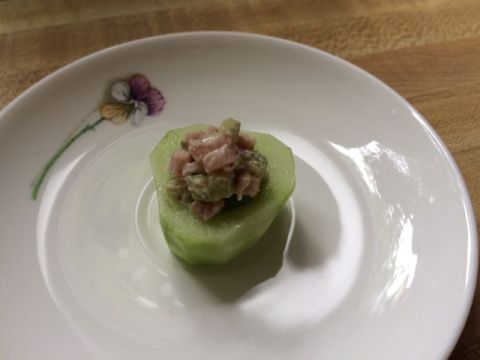
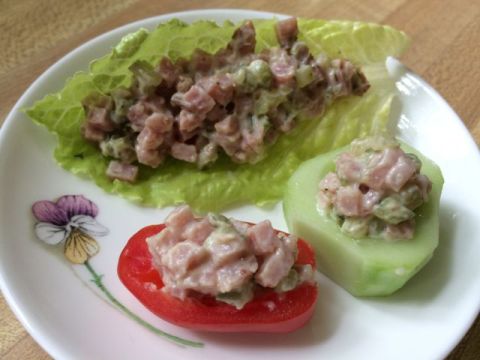
My first ham salad sandwich was made with cloud soft Wonder Bread. As my recipe evolved so have the many ways I consume this simple salad. As photographed above, any type of bread works but it’s not only for sandwiches now…
Ham Salad on Salad.
Ham Salad in Cucumber Cups.
Ham Salad in Lettuce Wraps.

Ham Salad in Tomato Cups.
Always served (and eaten) with a smile.
Roasted Beets with Balsamic Glaze
April 8, 2012 § 3 Comments
For many people what comes to mind when they think about eating beets are deep red slices pickled in a jar or cubes swimming in a bowl of bright pink borscht. But this vitamin rich, often neglected vegetable needs very little seasoning to enhance its sweet flavor
Beets are a rich source of antioxidants and nutrients, including magnesium, potassium, vitamin C, and betaine. Beetroot juice has been shown to lower blood pressure and improves cardiovascular health.
This recipe is a versatile dish that can be used as a vegetable side, sprinkled on a salad, or topped on pieces of Crostini with goat cheese spread.

NOTE: You can use all one color beets or as I note in this recipe, half red and golden. If you choose to use two colors be sure to mix them at the last minute because the color of the red beets will bleed into the lighter colored beets.
¾ lb Red Beets, peeled and cut into ¼-inch cubes
¾ lb Golden Beets, peeled and cut into ¼-inch cubes
Salt and Pepper
2 Tbls. Rosemary Garlic Oil or Olive Oil
2 Tbls. Balsamic Glaze (recipe below)
Preheat oven to 375°. Line a large baking sheet with parchment paper (alternately, use two smaller baking sheets). Set aside.
Place red beets in a bowl, add 1 Tbls rosemary garlic oil or olive oil and stir until oil evenly coats beets. In a separate bowl, do the same with the golden beets.

Pour the red beets on one side of the baking sheet and the golden beets on the other, leaving about a 1-inch space between beets. Spread the beets so the cubes are one layer thick. Sprinkle with salt and pepper. Bake until you can pierce a piece of beet with a fork easily but still be slightly firm, about 20-25 minutes.

If you plan to serve immediately, pour the beets into a large bowl. If you plan to serve later, pour each type of beet into separate bowls and combine shortly before serving.
When ready to serve, stir in 2 Tbls of the Balsamic Glaze into beets. Beets can be served warm, room temperature, or cold.

Balsamic Glaze
½ cup Balsamic Vinegar
3 Tbls. Brown Sugar
In a saucepan, combine balsamic vinegar and brown sugar. At medium-high heat, bring the mixture to a boil stirring occasionally. Lower the heat to medium-low and simmer for 10 minutes. Remove from heat and let cool. Store in an airtight container for up to one week at room temperature.
SERVING SUGGESTION: Spread soft goat cheese onto Crostini, top with roasted beets and minced chives. Try this recipe with Rosemary and Garlic Focaccia.

For those of you who are like me and like to have an old fashion printed copy of recipes, the below link is to a PDF (minus photos to keep it on one page).
Rosemary and Garlic Focaccia
April 6, 2012 § 2 Comments
There is something heavenly about the smell of fresh baked bread. Add herbs and garlic to that and you begin to wonder if the smell is heavenly or sinfully good. This recipe for Rosemary and Garlic Focaccia will produce a flavorful bread with a pillow soft texture. The dough is prepared in a bread machine but it is baked in the oven.

This recipe is adapted from Thyme Focaccia and Parmesan Focaccia on Epicurious’s website. These directions utilize a bread machine to make the dough. If you do not have a bread machine, please refer to the Epicurious recipe for directions to make dough using a standing electric mixer.
SPECIAL EQUIPMENT: Bread machine.
2 ¼ cups water, warm (105°‐115° F)
1/3 cup Olive Oil
5 cups Bread Flour, plus some when rolling out dough
5 tsp. Active Dry Yeast (or two ¼ oz. pkgs.)
1 tsp. Sugar
1 tsp. Salt
2 Tbls. Olive Oil
2 Tbls. Cornmeal
¼ cup Rosemary Garlic Olive Oil
Roasted Rosemary leaves and Garlic from making Rosemary Garlic Oil*
Coarse Salt and freshly ground Black Pepper
* This Focaccia recipe is a great way to utilize the garlic and rosemary that is used to make the Rosemary Garlic Oil but fresh rosemary and garlic could also be used. Just note that the flavors will be slightly sharper using fresh versus cooked.

Roasted rosemary and garlic from making Rosemary Garlic Oil
NOTE: If your bread machine specifies a particular method to adding ingredients, follow the directions of your machine. My bread machine is a Williams-Sonoma brand and recommends adding liquids first, followed by flour, then other dry ingredients.
Pour warm water and olive oil into bread machine pan. Be aware that the temperature of the oil will affect the temperature of the water, so if the oil is slightly cool, you should have your water on the warmer side.
Carefully add the flour to the pan, trying to get the flour to float on top of the liquid but cover the surface so you can no longer see the liquid.
In the center of the pan, where the paddle will mix the dough, make an indent in the flour and add the yeast.
In one corner, add the sugar and in another corner add the salt.
Set the bread machine to just mix the dough and warm to first rising. Be sure that the machine will not mix the dough for the second rising or cook the dough. This process generally will take 1 to 1 ½ hours depending on the bread machine.
NOTE: Remove the bread promptly when the bread machine signals completion. This dough rises easily. In the photo below, I let the dough sit for an extra half hour. As you can see, the dough rises beautifully but it was quite a mess…

While dough is being made, prepare an 15 ½”x10” stoneware bar pan (I use the Pampered Chef Stoneware Large Bar Pan) by brushing with 2 Tbls. olive oil, then sprinkle with 2 Tbls. Cornmeal. Alternately, you can make 2 smaller loaves. Set pans aside in a warm place (cold pans will inhibit the second rising).
The prepared dough will be very soft and moist. Remove dough from bread machine and pour out onto a floured surface. Do not knead dough. Using floured hands, press dough flat to about 1-inch thick. Fold dough into thirds. Press lightly and turn 90-degrees. Fold dough into thirds again.

NOTE: The purpose of the folding is to create layers in the dough. During the second rising fine air pockets will form and the dough will become lighter and fluffier when cooked.
Using a rolling pin, roll dough into a flat rectangular shape, slightly larger than the pan. Carefully transfer dough from table surface into prepared pan, pushing the dough into the pan around the sides so it fills the whole pan. Don’t worry about wrinkles in the dough. Brush the dough with the Rosemary Garlic Olive Oil. Top the Focaccia with roasted rosemary leaves and slices of roasted garlic. Lastly, sprinkle coarsely ground salt and pepper. Set aside in a warm place for 30 minutes for second rising.

Preheat oven to 400° (375° if your oven runs hot) Using your finger, press indents about every 3-4 inches apart all over bread. Bake the bread for 12-14 minutes.
SERVING SUGGESTIONS: Try this focaccia with a drizzle of Rosemary Garlic Oil and Balsamic Glaze. Top slices of rosemary and garlic focaccia with goat cheese, roasted beets, and chives.

For those of you who are like me and like to have an old fashion printed copy of recipes, the below link is to a PDF (minus photos to keep it on one page).
